Introduction
In this article we explain how to easily set up an ACD with the standard settings Axeos offers. With the default settings you can set up a solid working ACD which is set up in just minutes.
The Axeos pbx allows you to set up your call queues to fit seamlessly with your company’s work method. The set up can be very complex; do not hesitate to ask Axeos to help you so you can set it up optimally for your situation.
ACD configuration
Go to Actions/ACD and create a new ACD.

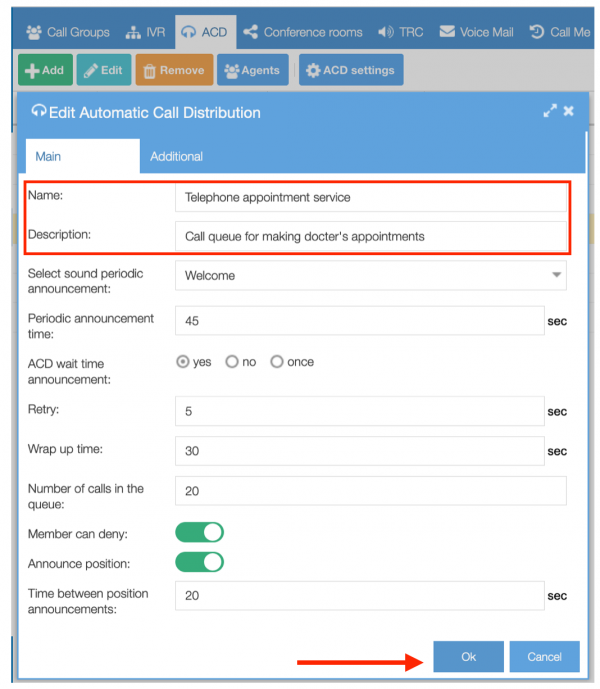
Tab Main
Choose a name voor your ACD and a description. Click OK and your ACD will be created.
This ACD will have these characteristics:
- The caller will hear music on hold;
- The caller will hear an announcement with the estimated waiting time in between;
- The hone rings at the chosen agent for 20 seconds and, when not picked up, will go to the next agent after a 5-second waiting time;
- When the agent has ended the call, he/she will not get a next call for 15 seconds (wrap up time);
- The agent is allowed to deny an incoming call;
- The pbx chooses available agents on the basis of whose turn it is. It remembers the last caller and chooses the next available agent.
- If there are no agents logged on, calls will not be placed in the queue.
- If all agents are logged off, the calls already in the queue will be removed from the ACD.
Adding agents to a call queue
To add a queue member select the queue (Actions/ACD) and click the ‘Agents’ button on the menu bar.
Click add to add a new queue member and choose the user(s) you want to add.
Click OK.
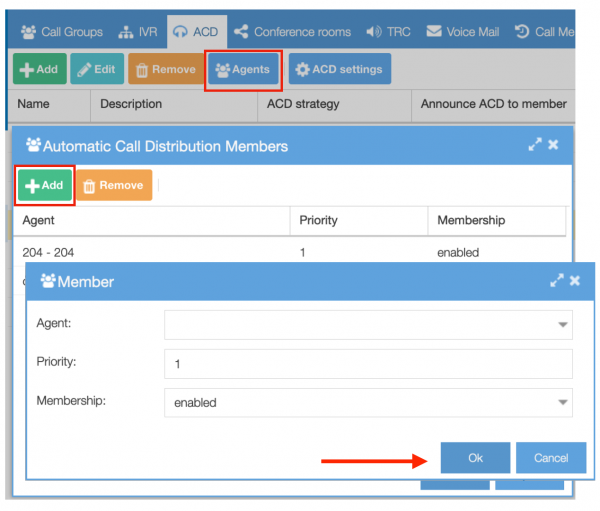
An agent can be part of multiple queues.
Using the queue in the dial plan
Now you have an ACD and the ACD has members, you can incorporate it into your dial plan. You do this by creating an action rule in Inbound.
ACDs are powerful and can be used by linking to incoming calls in your dial plan. You can also connect ACDs to an extension or an IVR. One queue can be reachable in several ways, each with a different policy. There a lot of flexibility to support your business.
You can create many actions. For example make a queue conditional, based on the CallerID and then select a specific language so you can serve your customers in their own language. You can combine ACDs perfectly with time as well, using time based call routing.
In this example we create a simple dial plan.
First go to Dial Plan/Inbound/Add to create a new dial plan.

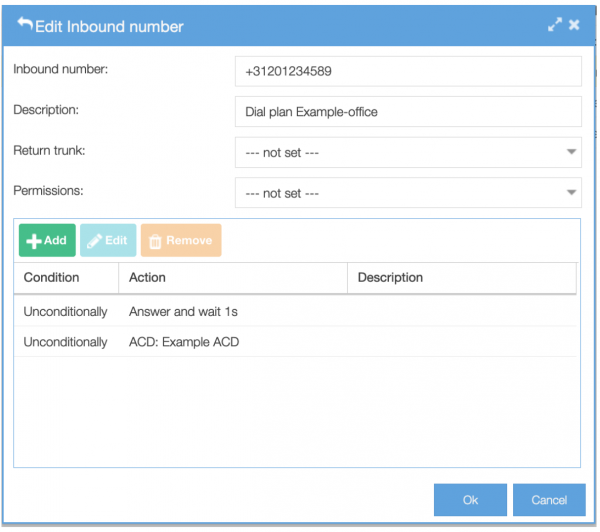
In the field ‘Inbound number’ you fill in your own general office phone number.
Give your ACD a description (what does it do).
Now click Add so you can add a new rule to your dial plan.
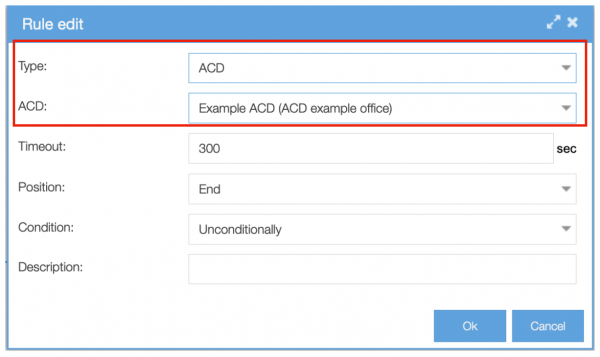
Type: in this case ACD;
ACD: choose the ACD you want. So you first have to create an ACD.
Click OK and the rule is added to the dial plan.
To make this dial plan working, we have to add one more rule. This rule is needed to open the audio channel when the call is not answered by a human but for instance by playing music on hold.
Click on Add to add another rule. This time choose ‘Answer’ as type. After that click OK.
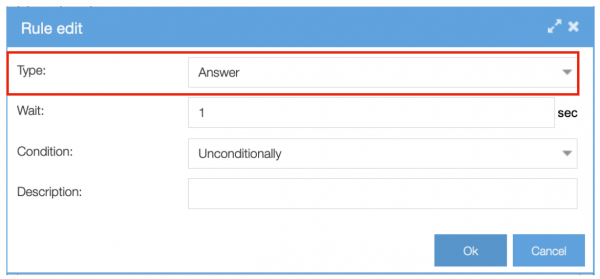
If you have clicked OK, you will now see two rules.
The last step is to drag and drop the second rule to the first place so the rules are in the right order. Now it should look like this:
Please note that this dial plan is not entirely finished yet: if a call gets a time out in the ACD, it should be routed to a new action. Read more about this in the articles on dial plans.