Because of the General Data Protection Regulation (GDPR), we urge you to update vpbxes running on versions 3.4.x to the latest 4.1.x release (currently 4.1.9). This article describes the steps you should take to upgrade 3.4.7 vpxbes to the latest release.
If you have vpbxes that run older firmware than 3.4.7, please first upgrade these to version 3.4.7 prior to upgrading to 4.1.x
These are the guidelines for updating a 3.4.x vpbx to 4.x. Read these carefully and follow the instructions.
With version 4.0 in Q1 of 2017 we introduced a major release with significant new features and advantages over 3.x versions. Updating your vpbxes to the latest firmware will be an easy task when you follow this article closely. It describes the preliminary steps to take before upgrading and how to handle various scenarios that might apply to your situation.
It’s important to read this article fully in advance and make your preperations to ensure a smooth update path for your customers.
Prerequisites
Prior to initiating the upgrade process (or before asking your supplier to do so in case you don’t have access to the Service Provider Portal yourself) please read the general directions below carefully and after making any necessary changes as a result make sure you have downloaded a backup of your vpbx configuration. Only then proceed to the scenario that applies to your situation.
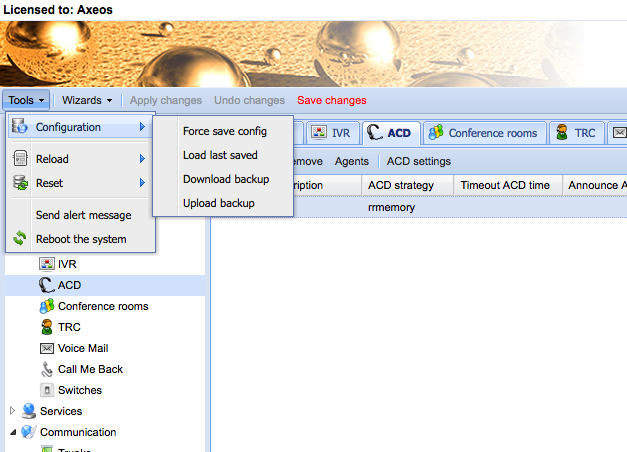
If you have never downloaded a backup before note that you can do so via the ‘tools’ menu: Look in the upper left corner of the web interface of your vpbx. Menu: Tools/Configuration/Download Backup.
General directions
First ask yourself the following questions step-by-step and prepare accordingly:
- Are your phone devices using the vpbx phonebook and/or are you using phone device vendors other than Yealink or Snom?
- Version 4.0 and up no longer allow phonebook access over plain HTTP. Pay attention whether or not your phone devices support HTTPS for remote phonebooks or if you’re using unsupported vendors. See Directories.
- As you read in directories the phonebook url set in your phone devices will need to be changed to use https and port 442. If you use zero-touch provisioning the url will be set automatically.
- Check your vpbx firewall; can the phone devices access the phonebook on port 442? Open this tcp port to your customers public IP address if necessary.
- When you use outdated devices that do not support HTTPS you choose not to use the remote phonebook in order to prevent data leaks, because due to the GDPR you cannot access your phonebook over plain unencrypted HTTP. Consider swapping your old phone devices for newer ones.
- Are your phone devices running up-to-date firmware versions?
- Are you going to use the remote phonebook provided by the pbx and/or are you going to use autoprovisioning? Then check whether or not your phone devices are running up to date firmware. If not, update first to prevent issues during provisioning.
- You can update the firmware manually, or
- if you used regular provisioning in the past you can set a firmware upgrade url in the phone template and/or phone config files: e.g. for Yealink
firmware.url = http://ipaddress/firmware.rom(where you uploaded your firmware file). - Netherlands only: Yealink devices supplied by Lydis update their firmware automatically after resetting the phone device (keep the OK button pressed until the device asks you). Check afterwards if the firmware update was indeed succesful.
- Are you going to use the remote phonebook provided by the pbx and/or are you going to use autoprovisioning? Then check whether or not your phone devices are running up to date firmware. If not, update first to prevent issues during provisioning.
- Are you using numerical-only SIP usernames in this vpbx?
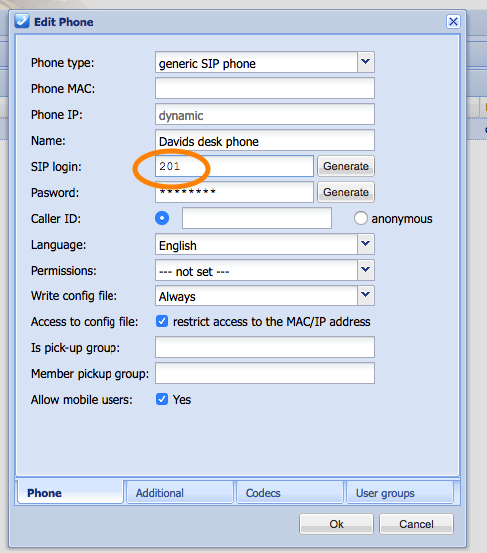
- We’ve always discouraged using these and our new SIP stack doesn’t allow these anymore. On upgrading from 3.4.x to 4.x any numerical-only SIP usernames (formerly: SIP login) will automatically be prefixed ‘sip’. Please note the SIP username is not the same as a phone name or system username. E.g. a SIP username ‘201’ will become ‘sip201’. The SIP username doesn’t have to be sipxxx, it can be e.g. kxWw3d, just as long as it doesn’t consist of merely numbers. A sip username that starts with a digit is allowed.
- If you do not take action the phones will try to register using the wrong SIP username after an upgrade and therefor be unreachable. There are two paths that help you prevent this from happening;
- Preventively edit the SIP usernames in Communication/Phones and then edit the SIP username in the phone devices before you upgrade. You can use the ‘generate’ button to have the pbx generate suitable SIP usernames. Or
- Use zero-touch provisioning to let the phones retrieve their new configuration (automatically on-update changed SIP usernames included).
- We’ve always discouraged using these and our new SIP stack doesn’t allow these anymore. On upgrading from 3.4.x to 4.x any numerical-only SIP usernames (formerly: SIP login) will automatically be prefixed ‘sip’. Please note the SIP username is not the same as a phone name or system username. E.g. a SIP username ‘201’ will become ‘sip201’. The SIP username doesn’t have to be sipxxx, it can be e.g. kxWw3d, just as long as it doesn’t consist of merely numbers. A sip username that starts with a digit is allowed.
- Have you made custom changes in the phone templates or the phone configuration files?
- If so: From version 4.1.3 the vpbx web interface offers you a way to add and change custom settings in phone templates and phone config files. This saves you from downloading files through FTP, making changes on your local machine, and uploading the files again. However, this change means that upgrading to 4.1.3 or later does bring about some (onetime) copy & paste work after upgrading, if you’ve made custom changes in the templates or phone config files. As a result of this new feature existing templates are overwritten. This could not be avoided (as we can’t recognise what custom settings you’ve added where) and because of that the update might requires a little bit of work from you. Considering the advantages the Extra Config feature provides you it’s worth it as it saves you a lot of time in vpbx administration in the future.
- Set “Write config file” to “Never” before executing the upgrade in order to avoid a situation where generated config files are overwritten and phones may use extra network settings. You can change this setting when you edit a phone through communication/phones menu in the general tab. After the upgrade you should add your customisations (only your customisations – not the entire template file!) through the Extra Config tabs as described below before proceeding to set the ‘write config file’ setting for your phone back to ‘always’ to write your extra config settings to the config file.
- Read up on using ‘Extra Config’ here (phone type templates) and here (specific phone config).
- Is your vpbx using hotdesking (mobile users/advanced mobility functions)?
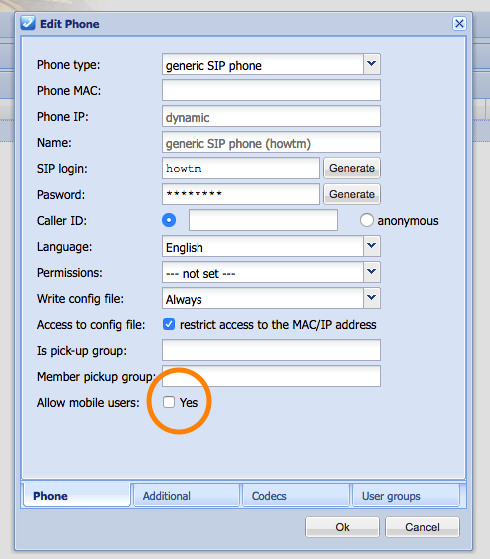
- Please note that you can not have a phone set as ‘primary phone’ (in 4.x: ‘personal’) and use hotdesking on it. They’re mutually exclusive. A phone you claim as personal should not be used by other users as a flexible hotdesking device. Make sure your primary phones have the ‘allow mobile users’ setting disabled. You do this in the Phones. (Communication/Phones, edit Phone – Phone tab).
- Please note that you can not have a phone set as ‘primary phone’ (in 4.x: ‘personal’) and use hotdesking on it. They’re mutually exclusive. A phone you claim as personal should not be used by other users as a flexible hotdesking device. Make sure your primary phones have the ‘allow mobile users’ setting disabled. You do this in the Phones. (Communication/Phones, edit Phone – Phone tab).
- Is your vpbx using ACD’s? (call queues)
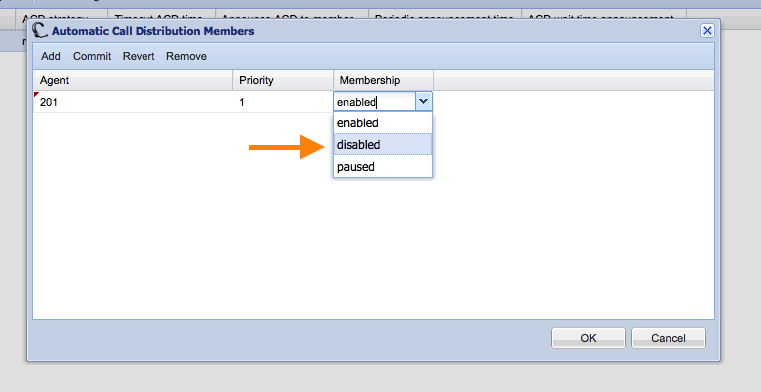
- Disable all agents in all ACD’s. Really disable them, not just set them to paused. You can re-enable the agents after the upgrade. The menu location where you can do this remains unchanged in the 4.x version.
- Have you checked trunks and phones for the same names?
If you have e.g. a trunk named “my_company” and a phone also named “my_company” you should change one (either the trunk name or the phone name) so they’re not the same anymore. Repeat if you have multiple trunks/phones that have duplicate names. - Are you using switches and/or timerules?
Switches and timerules have become seperate license options since version 4.0.1. If you use these, you need to create and install a new license that includes these. You can do this either prior to the upgrade or afterwards. Existing switches and timerules will continue to function, but without a valid license that contains the switches and timerules modules you will not be able to edit them in the web interface or add new ones. If you do not have access to the Service Provider Portal (SPP) ask your supplier to handle this. In most cases though your supplier will have already installed new licenses to be ahead of this. - Are you using the g729 codec?
Support for g729 ended with Axeos version 4.0. If you are using this codec in a 3.x pbx please be cautioned that this codec will no longer work when you upgrade to 4.x. Codec g729 brought about inherent disadvantages as dual-tone multi-frequency signaling (DTMF), fax transmissions, and high-quality audio cannot be transported reliably using the g729 codec. The GSM codec can be a valid alternative choice for your low-bandwith codec requirements. - Have you downloaded a backup of your vpbx configuration?
- Make sure you have downloaded a backup of your vpbx configuration. If you have not, you can do so via the ‘tools’ menu. Look in the upper left corner of the web interface of your vpbx. Menu: Tools/Configuration/Download Backup.
- Make sure you have downloaded a backup of your vpbx configuration. If you have not, you can do so via the ‘tools’ menu. Look in the upper left corner of the web interface of your vpbx. Menu: Tools/Configuration/Download Backup.
- Ready? Now choose one of three scenarios that fits your situation.
- Scenario 1: You are using Yealink and/or Snom phones and want to use zero-touch provisioning
- Scenario 2: You are using different phone vendors and/or want to use regular provisioning
- Scenario 3: You prefer manual configuration of phones
Scenario 1: You are using Yealink and/or Snom phones and want to use zero-touch provisioning
- Do you have a backup of you vpbx configuration? If not; download one via the ‘tools’ menu. Look in the upper left corner of the web interface of your vpbx. Menu: Tools/Configuration/Download Backup.
- Initiate the update or schedule the update with your supplier.
- Go to Phone Global Settings in Communication/Phones. Check the PBX address and change it if necessary. This must be an address that resolves.
- Check communication/provisioning and enable zero-touch provisioning. Make sure your phones are enabled for provisioning.
- Add any custom configuration settings via the ‘extra config’ tabs in Communication/Phones tab Global Settings (if these are template settings that apply to all your phones) or to the ‘extra config’ tab in your Phone (Communication/Phones edit Phone)
- Note that the SIP Usernames (formerly SIP logins) may have changed during the update process (if you used numerical-only SIP logins). If so, you should check the ‘write config file’ setting to be ‘always’ or the config files will not contain the new SIP usernames. The phones will register only after they loaded their configuration. The provisioning process might require your phone devices to reboot several times. It will (this time) take a little bit longer for the phones to register than you were used to in 3.x to 3.x updates.
Scenario 2: You are using phone vendors other than Yealink and Snom and/or want to use regular provisioning
- Do you have a backup of you vpbx configuration? If not; download one via the ‘tools’ menu. Look in the upper left corner of the web interface of your vpbx. Menu: Tools/Configuration/Download Backup .
- Initiate the update or schedule the update with your supplier.
- Go to Phone Global Settings in Communication/Phones. Check the PBX address and change it if necessary. This must be an address that resolves.
- Check your config files and verify your pbx address.
- If you’re using Yealink or Snom: edit the url for the remote phonebook in the config files as it’s changed in 4.x. Read directories on this topic.
- Download the pbx certificate and upload it in your phone device. Read directories on this topic.
- If you have not preventively edited the SIP usernames in Communication/Phones prior to the upgrade edit the SIP usernames in the config files.
- Note that the SIP Usernames (formerly SIP logins) may have changed during the update process (if you used numerical-only SIP logins). If so, you should check the ‘write config file’ setting to be ‘always’ or the config files will not contain the new SIP usernames. The phones will register only after they loaded their configuration. The provisioning process might require your phone devices to reboot several times. It will (this time) take a little bit longer for the phones to register than you were used to in 3.x to 3.x updates.
Scenario 3: You prefer manual configuration of phones
- Do you have a backup of you vpbx configuration? If not; download one via the ‘tools’ menu. Look in the upper left corner of the web interface of your vpbx. Menu: Tools/Configuration/Download Backup .
- Initiate the update or schedule the update with your supplier.
- Go to Phone Global Settings in Communication/Phones. Check the PBX address and change it if necessary. This must be an address that resolves.
- Check your config files and verify your pbx address.
- If you have not preventively edited the SIP usernames in Communication/Phones prior to the upgrade edit the SIP usernames in the config files.
- Note that the SIP Usernames (formerly SIP logins) may have changed during the update process (if you used numerical-only SIP logins). If so, you should check the ‘write config file’ setting to be ‘always’ or the config files will not contain the new SIP usernames. The phones will register only after they loaded their configuration. The provisioning process might require your phone devices to reboot several times. It will (this time) take a little bit longer for the phones to register than you were used to in 3.x to 3.x updates.
Post-upgrade: improving security
- You can request a Let’s Encrypt certificate (or one of other vendors).
- You can setup call encryption for specific phone devices or for all your phones connected to this vpbx.
- Are you already using the Abuse Prevention feature?
- Consider tightening security even more by restricting access to the GUI, API and provisioning; check your Network Servers HTTP tab for options.
Frequently asked questions (FAQ)
- The provisioning URL in my phone doesn’t match the URL I use to browse to the pbx web interface. Where to change the provisioning URL?
- DNS is the important factor here. Go to Communication/Phones and click the “Global settings” button. Change the PBX Address setting. Click here for more information on provisioning.
- My phone doesn’t display the remote phonebook after upgrading
- Version 4.0 and up no longer allow phonebook access over plain HTTP. If your phone devices don’t support HTTPS for remote phonebooks they will no longer be able to obtain phonebook data after upgrading, as mentioned earlier in general directions.
- If you’re using regular provisioning or manual configuration please note that the phonebook url has changed. View more to learn what url to set.
- You may need to download the pbx certificate and upload it into your device (unless you are using zero-touch priovisioning). Read directories for more information.
- Check your vpbx firewall; can the phone devices access the phonebook on port 442? Open this tcp port to your customers public IP address if necessary.
- Check your phone device firmware. Some older firmwares have a buggy SSL/TSL implementation. Update your device firmware and retry.
- After updating to 4.1.4 I see an error when I go to Communication/Provisioning in the web interface menu.
- Check System/Options/SPP Settings for the SPP url and Shared Secret. If none are set, contact your supplier.
- After updating my call transfers are failing. What to do?
- Go to System/Users, double-click one of your users (it does not matter which one) to open the edit view and then click the OK button.
- After updating I can call outbound, but inbound calls fail.
- Check the ‘peers addresses’ in your trunk (Communication/Trunks, edit your trunk – General tab). Version 4 requires you to enter your SIP trunk providers IP address(es). If there are multiple IP’s then enter these comma seperated. Peers addresses is a required field when “Peer authentication” is set to IP.
- Afer updating I can receive inbound calls, but outbound calls fail.
- Check menu Dial plan/Options. Disable any active call parking of transfer settings, then click the ‘Apply Features’ button. Retry dialling outbound. You can re-enable your call parking and transfer settings afterwards. When you do, don’t forget to again click the ‘Apply Features’ button.
- My former local admin user has access to call recording after the update while I did not assign this.
- A ‘local admin’ user is automatically converted to be a regular admin in 4.x. Check the System/Roles menu. We introduced a new role-based management allowing for more fine-grained user access control in version 4.0 where you can now create roles that allow access to specific parts of the interface, then assign these roles to users.
- When accessing the vpbx web interface my browser shows me a message that this is possibly unsafe. What now?
- Web browsers are focusing increasingly on use of HTTPS and of valid certificates. The vpbx provides you with a self-signed certificate by default. This self-signed certificate can not be validated by a third-party and that’s why your browser displays a message. Most browsers allow you to continue after acknowledging the displayed warning.
- Since version 4.1.0 you can request a free third-party validated certificate from Certificate Authority Let’s Encrypt. We’ve automated the whole process and these certificates, once succesfully requested and installed, are automatically renewed. Read Certificates to use these.
- Alternatively you can generate a CSR and buy a certificate. E.g. here.
- After upgrading I don’t see my time rules and switches menu. How come and how to get them back?
- From 4.0.4 time rules and switches became seperate license-options, so if your supplier did not yet renew your license with time rules and switches included you’re missing these upon upgrade. Ask your supplier to add these.
- I have a question that is not covered by this article. Where do I turn to for support?
- Your point of contact is always your direct supplier. Their staff is trained to support our products and can access your vpbx to troubleshoot issues. We’re in close contact with our partners if they require our assistance in order to help you.