There are scenarios where you’d want to share office workstations (and therefore phones) among multiple employees on different shifts as opposed to each staff member having their own personal desk and phone. The PBX enables you to fit this use case perfectly.
It is also possible to logon to a phone from home as if you were in the office, or with multiple office locations. Connect the phone to the internet, the user logs on with his personal account and the phone is ready to be used.
What’s great is that you can also move around workstations bringing along your users CallerID this way. A Caller ID set in your User overrides any set in the Phone and any set in the outbound trunk.
Step 1. Enable hotdesking on phone
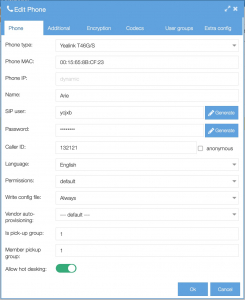
Go to menu Communication/Phones, edit your phone and enable hotdesking. Click ‘OK’ to confirm.

Step 2. Enable hotdesking for a user
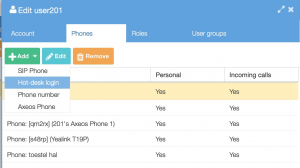
Go to menu System/Users, edit your user, go to Phones tab, and add ‘hotdesking’. Click ‘OK’ to confirm.


Step 3. Login
- All set! Time to login. You can now login on the phone by dialling *81. Alternatively you can also dial *81201 if e.g. your user is 201.
- You’ll be asked to input your user ID (e.g. ‘201’) and PIN code (if you don’t remember your users PIN code you’ll find this in menu System/Users, Account tab).
- You’re now logged in on your device.
Step 4. Logout
Want to logout for a break or at the end of the day? Dial *82.
Caveat: use PBX user instead of VoIP phone
As you’re using hotdesking, you’ll obviously want to aim your dial plan at the users and not the phones. Use ‘PBX User’ in your dial plan and extension action rules instead of ‘VoIP phone’.
Permissions
You can apply one permission profile to the phone and another to the user. That way you can e.g. restrict phone devices to only allow dialing 112 emergency services – until a user has logged on.