General
Inbound enables you to define what should happen to an inbound call. In other words when you receive calls. The rules you create here define your dial plan. General information on what a dial plan is and how to use it, can be read in this knowledge base-article. We give you tips on how to set up a dial plan by first drawing up a scheme. With the scheme it will be easier to define the inbound rules later on.
To start a dial plan for an inbound number, click on Dial Plan/Inbound/Add.
Enter the inbound number as it is presented to the Axeos PBX. This varies between carriers so please consult your provider if you do not know what format to use.
Description: give a clear description of the dial plan.
Return trunk: (optional) Default value not set, only set when needed. If needed, select the trunk that will be used if the action places an external call and you want to force a specific trunk, other then the default trunk. Trunks configured as an Outbound trunk will be available to choose from.
Permissions: (optional) Default value not set, only set when needed. If needed, select the permission profile to be applied to the number. Permission profiles configured in Services/Permission Profiles will be available to choose from.
Add rules
You can now add rules to this number to create the dial plan. To configure a new action click on ‘Add’. You can use drag&drop to change the order of the rules.
Please note the fields available change depending the options you choose. Check for details about actions in this list of types.
Each rule can be executed only if a certain condition applies. Conditions are: time, the number of the person calling you, whether a switch is on or off, et cetera.
Please note that when there is no human answering the call but you do want to have an active audio channel (music on hold, DTMF etc.), you must add a rule with the answer action to instruct the PBX to set up the RTP (=audio) as well.
When a rule tells the PBX to execute rules defined in the menu extensions then it will not return to the inbound rules.
The PBX enables you to nest groups of rules. Nesting means you call a routine and when the routine is done then it will continue with the rest of the rules you have defined in inbound. Do keep in mind that termination actions will stop further processing regardless. For example an action hangup will disconnect the call and will never continue with the next set of rules, the same applies for voicemail as this is an action that picks up the call.
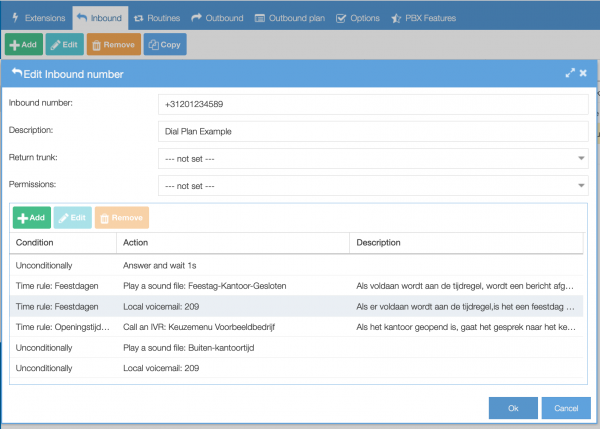
A dial plan example
In this example we will create a simple dial plan.
The call comes in on +312012345989. In this example this is the telephone number of our Example-office.
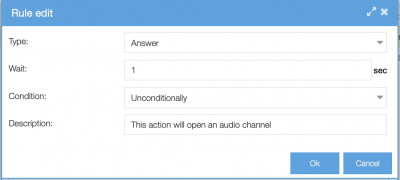
Rule 1
We might need a message to be played, but the call is not answered by a human yet. So first we have to add a rule in which the audio channel will be opened.
Rule 2
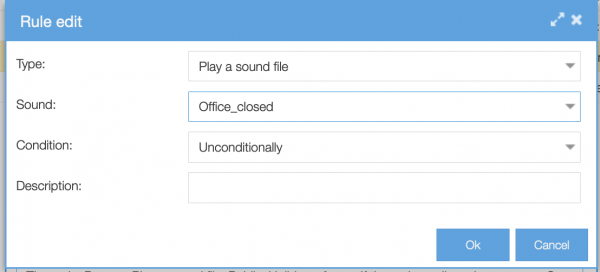
Next the pbx checks whether today is a public holiday on which the office is closed. If so, a message will be played about the office being closed and a telephone number will be given in case of an emergency. Also, the caller will get the opportunity to leave a voicemail.
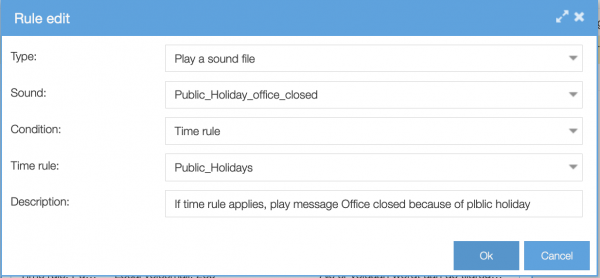
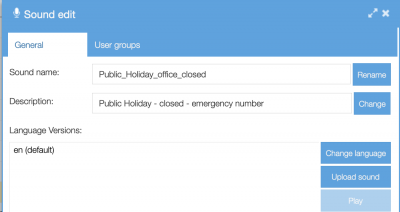
To be able to create this rule, you should first record and upload the necessary sound files. This can be done in Services/Custom Sounds. How to do this, will be explained in this knowledge base-article on custom sounds.
Also you need to create a time rule first. In this case the time rule ‘public holidays’. This can be done in Services/Time rules. Read more on how to do this here.
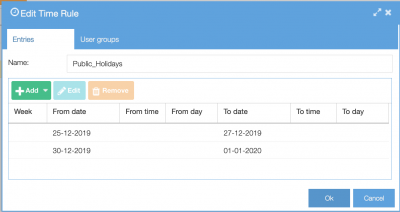
The office is closed with Christmas and New Year’s Eve
Rule 3
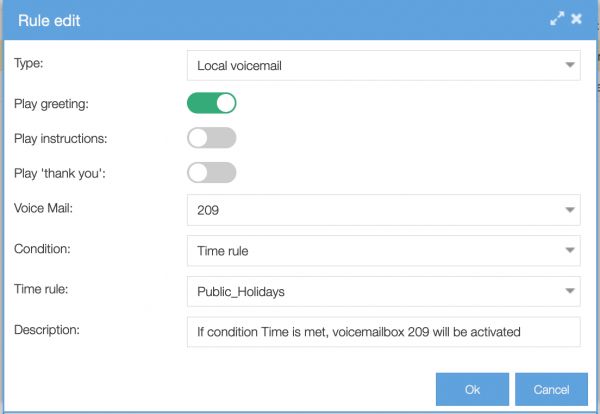
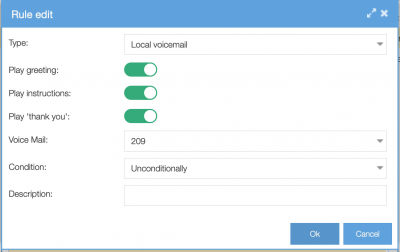
The message in rule number 2 gave the caller the opportunity to leave a voicemail. That is why we will now create a rule in which the voicemail-box will be activated. This rule should only be activated when today is a public holiday so we add the ‘time’-condition.
Rule 4
Rule number 4 will lead the caller to the IVR, the menu, UNLESS the caller called outside office hours.
The rule we choose at Type is ‘Call an IVR’. Next you can choose which IVR you need. Note that you first need to set up the IVR in Actions/IVR.
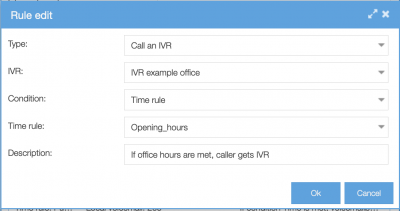
The IVR will only get activated when the condition of the time rule is met.
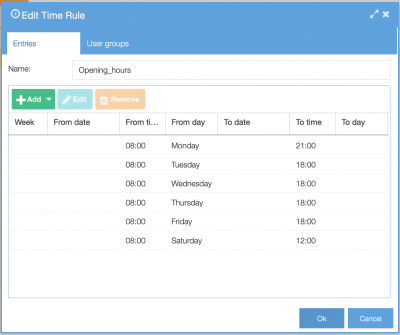
General opening hours of example office
The IVR contains the same kind of rules that lead the caller to the right choice. The IVR is a dial plan in itself. In this example-IVR the call is being handled depending the choice(s) of the caller. If a time-out applies because for example there was no one available for the caller, the call will return to this dial plan, at rule number 5.
If you wish to read more on IVRs, please read our knowledge base-article on IVRs. You will also find the IVR mentioned in this example.
Rule 5
During rule number 4, the caller was led to the IVR, UNLESS the caller called outside office hours. If that were the case, the call was led to the next rule in the dial plan, rule number 5. Rule 5 plays the message that the office is closed and the caller gets the opportunity to leave a voicemail.
As in rule 2, also for this rule you must have already recorded and uploades the sound file.
Rule 6
The message in rule number 5 gave the caller the opportunity to leave a voicemail. That is why we will now create a rule in which the voicemail-box will be activated. This time we use the condition ‘Unconditionally’, meaning this rule should always be activated after rule 5.
Now with all rules added, the dial plan for our example-office looks like this:
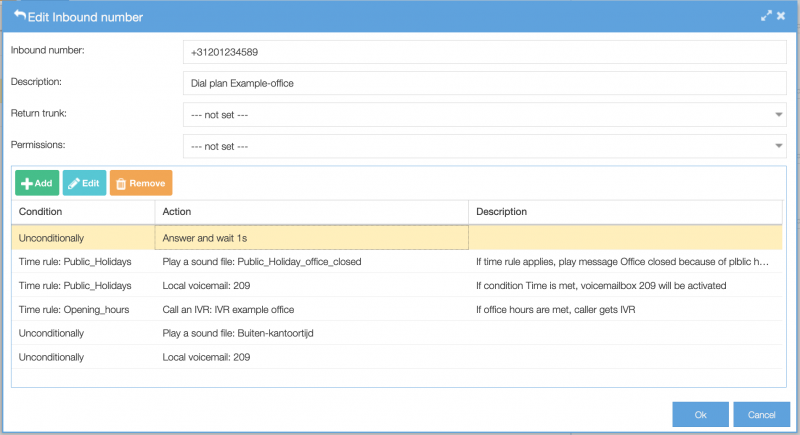
This is an example of a simple dial plan. Possibilities are unlimited, you can set it up just the way you want or need.
Using wildcards in the inbound dialplan
You can use wildcards to allow the use of number patterns in order to match more than one number. You can use this for instance if you want the same dial plan for 10 numbers. X is the wildcard:
Example: 020-123456x all numbers from 020-1234560 until 020-1234569 have the same dial plan. If you want an exception, you can just add this separately. Individual dial plans of extensions overwrite bigger dial plans. The smallest block (also 1 number) is leading.
Would you like to know more about this?
Return trunks
If you are using more than one outbound trunk and all these have a prefix (you can have 1 unprefixed outbound trunk), then you will want to specify the return trunk on your DID’s because the PBX needs to know the number to call back in various scenarios. If you have 2 trunks with prefixes and your DID does not have a “return trunk” set, the PBX takes the lowest prefix so you would be able to dial back to someone from your phone.
Example:
I have 2 trunks:
– SIP_something with prefix 0
– SIP_alternative with prefix 1
and now:
– If I don’t have a “return trunk” set in Inbound for +31204160640 then I will see “00031…” (triple 0) displayed on my phone.
– If I will set “SIP_alternative” as return trunk in Inbound for +31204160640 then I will see “131…” displayed on my phone.
– If I will remove “0” prefix from SIP_0 I will see 0031… callerid on my phone.
Extensions in the dial plan
When an action tells the PBX to execute rules defined in the menu extensions, it will not return to the inbound rules.
Example: In Inbound you have a rule “local extension”. In the menu extensions this dials an IP phone. If you have set a timeout of 30 seconds then it will not continue with the inbound rules you have further defined. It will simply stop in extensions or continue with other rules you have listed under the extension.
There is a solution for this: the use of Routines.
The PBX enables you to nest groups of rules. Nesting means you call a routine, and when the routine is done it will continue with the rest of the rules you have defined in inbound. Do keep in mind that termination actions will stop further processing regardless. For example an action hangup will disconnect the call and will never continue with the next set of rules. The same applies for voicemail, as this is an action that picks up the call.
Wildcards in het Inkomend belplan
Het is mogelijk om wildcards te gebruiken. Dit gebruik je als je bijvoorbeeld voor 10 nummers hetzelfde belplan wilt aanmaken. De wildcard is een x. Voorbeeld: 020-123456x zorgt ervoor dat het nummerblok 020-1234560 t/m 020-1234569 hetzelfde belplan heeft.
Mocht je een uitzondering willen maken, dan kun je deze gewoon los toevoegen. Individuele belplannen van nummers overschrijven grotere belplannen. Het kleinste blok (wat dus ook 1 kan zijn) is altijd leidend voor het belplan.
In ons kenniscentrum kunt u meer lezen over wildcards.
Return trunks
Als u meerdere uitgaande trunks gebruikt en deze hebben alle een voorvoegsel (prefix), dan zult u de juiste trunk moeten aangeven bij uw inkomende gesprekken. Dat komt omdat de PBX moet weten welk nummer terug te bellen in diverse scenario’s. Als u 2 trunks met voorvoegsels heeft en bij het Inkomend nummer is geen return trunk gespecificeerd, zal de PBX het voorvoegsel met het laagste nummer kiezen zodat u in staat bent om terug te bellen.
Bijvoorbeeld:
Er zijn 2 trunks:
– SIP_1 met voorvoegsel 0
– SIP_2 met voorvoegsel 1
- Als er geen return trunk is aangeven in Inkomend voor +31204160640, zal er in het display te zien zijn: “00031..” (3x nul)
- Als SIP_2 wordt aangegeven als return trunk in Inkomend voor +31204160640, zal er in het display te zien zijn: “131…”
- Als het “0” voorvoegsel verwijderd wordt uit SIP_1, zal het display aangeven: “0031…”.