Setting up the firewall in the right (and safe) manner can be very complex. Someone with in-depth knowledge of firewalls should do this. If you do not have someone with this knowledge, make sure you you hire an expert to check or setup your firewall.
Please also be aware that you need more than a firewall to secure your PBX. You can read our roadmap to a safer PBX.
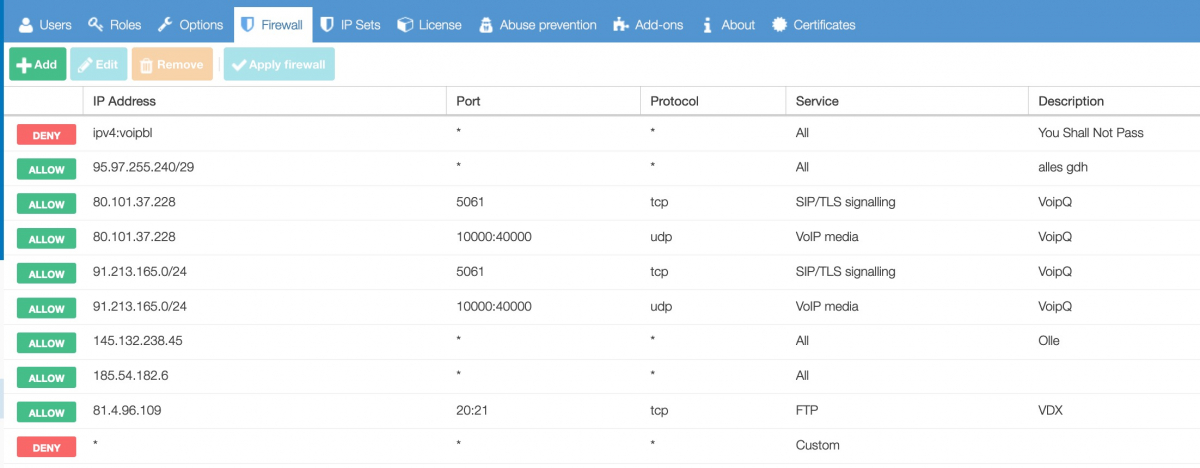
The PBX has an integrated firewall that helps you to limit access to the platform. We strongly advice to use this function, as it improves the security level of the platform and avoids fraudulent actions from unwanted parties.
General
Never use ‘Allow All’ 0.0.0.0/0 for all services in a production environment, as this will allow ALL traffic to access the server. This essentially disables your firewall.
Add or edit a firewall rule
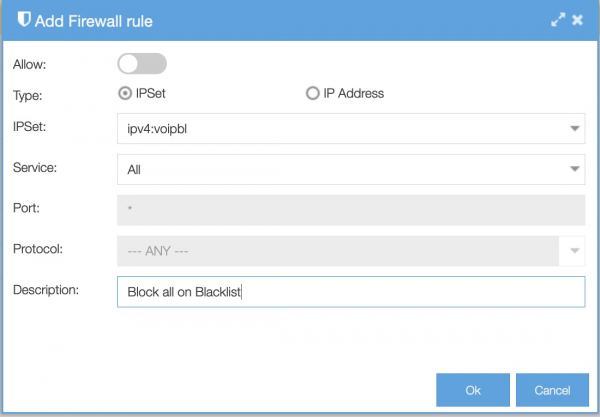
Go to System/Firewall and click Add (or Edit to change an existing rule).
-
Block or allow: choose ‘allow’ to give the IP subnet access, or choose the default disallow option to block it;
- Type: choose IP Set or IP Address. If you choose IP Set, you can choose from the IP Sets you have created or choose a default IP Set. If you choose IP Address, you enter the IP Address or range. For example, to allow an IP subnet: 1.2.3.0/24;
-
Specify the service of the connection to be allowed. It is always recommended to be as specific as possible; In this example we select All because we want to black everything from the IP Set-Black List;
-
Specify the port that will be permitted / blocked. Leave it as ANY for all ports.
-
You can specify the protocol that will be permitted / blocked. Leave it as ANY for all protocols.
-
Add descriptive comments for your own administration.
Click OK and use the ‘apply firewall’ button to write the table. To save it permanently you will need to apply the change and save the changes as well.
Subnet masks
The subnet mask can be found using the following overview:
| Netmask | Range | Subnet |
| 32 | 1 | 255.255.255.255 |
| 31 | 2 | 255.255.255.254 |
| 30 | 4 | 255.255.255.252 |
| 29 | 8 | 255.255.255.248 |
| 28 | 16 | 255.255.255.240 |
| 27 | 32 | 255.255.255.224 |
| 26 | 64 | 255.255.255.192 |
| 24 | 256 | 255.255.255.0 |
| 23 | 512 | 255.255.254.0 |
| 22 | 1024 | 255.255.252.0 |
| 21 | 2048 | 255.255.248.0 |
| 20 | 4096 | 255.255.240.0 |
| 19 | 8192 | 255.255.224.0 |
| 18 | 16384 | 255.255.192.0 |
| 17 | 32768 | 255.255.128.0 |
| 16 | 65536 | 255.255.0.0 |
New vs established connections explained
There are three things to keep in mind when using the pbx firewall:
-
The firewall affects only new connections.
-
Phones already registered will still be able to communicate SIP level (no media) with the PBX after being blocked by the firewall rules.
-
Even if a phone is not registered it will be able to communicate with the PBX some time after being blocked by the firewall rules. This can be stopped by a PBX reboot.
The Axeos pbx firewall is statefull – instead of checking each and every network packet against our firewall rules, it only checks the first packet of any connection and accepts any packet belonging to connections that were already established. This way the firewall is capable of distinguishing packets that are allowed and packets not allowed.
SIP is running over UDP by default and UDP is connection-less, so a firewall flow is not an individual connection (TCP), but any traffic between two address-port pairs. SIP phones usually connect from their port 5060 to the PBX on port 5060. After the first two packets have exchanged, the flow will be established and will only expire after a long time.
The PBX remembers registered phones over reboot (so they are reachable immediately after the reboot) and sends ‘qualify’ (keep alive) packets periodically to the phones. As the PBX initiated communication, this is always accepted and starts an established flow.