With the Reception Console (TRC) you can easily and efficiently manage many incoming calls from your desktop, laptop, tablet or smartphone. It is just a click to put incoming calls on hold. Or drag & drop a call to transfer quickly with or without talking to the person you are transferring to. When no one answers the call you can add extra actions in the dial plan to go to voicemail, an ACD or any other available action.
- Clear colour codes, so one look tells you about the source of call, status etc.;
- Warm transfer via quick list, manually or drag & drop;
- A clear overview of all phones: who is available, talking or DND etc.;
- Create your own quick dial list;
- Quick search box when you have many entries;
- Dial to external number to transfer calls to.
Setup
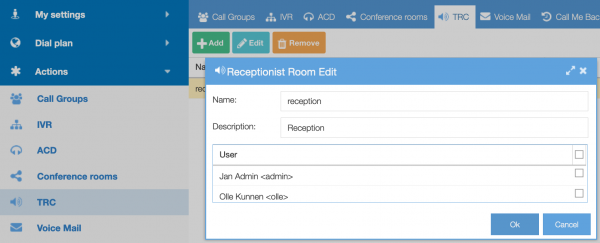
- The admin must first create a TRC room in menu Actions/TRC.
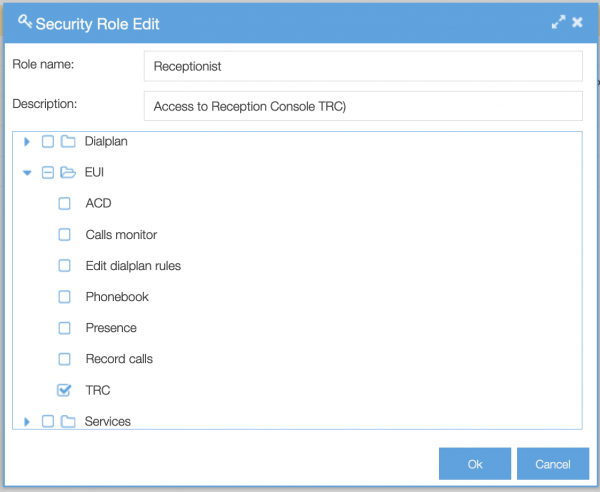
- Then in System/Roles add a role that allows users access to EUI/TRC.
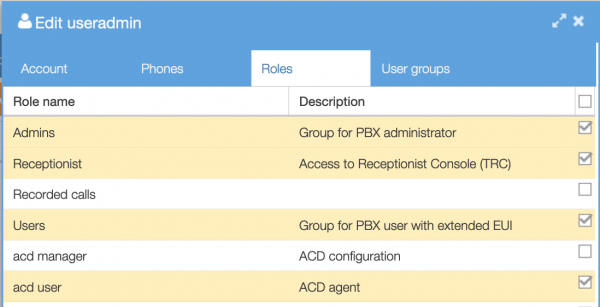
- Now go to System/Users, open a user that you want to be receptionist and go to the ‘roles’ tab. Check the TRC role that you created earlier.
- Now you can include the TRC in your dial plan. The TRC room itself is a dialplan action that can be selected from the drop down list, just like you add other actions to the dial plan.
The Receptionist console in the dial plan
The Receptionist console action rule has some options to specify its behaviour:

- Timeout: time out in seconds;
- Room: the receptionist room as defined in menu Services/TRC;
- Answer and put on hold: If ‘yes’, all incoming TRC calls will be answered and placed on hold. The default value is No;
- Leave TRC room: set when the call should leave the TRC room and go to the next dialplan rule. The default value is “On timeout only”;
- On timeout only: when timeout hits, the next dialplan rule is executed;
- When unavailable or busy: when receptionist is busy or unavailable, the next dialplan rule is executed;
- When unavailable: when receptionist phone state is unavailable then next dialplan rule is executed.
- Condition: use the TRC conditionally;
The TRC user web interface
A user can be a TRC member when he/she has been assigned a role that allows the user to be a member, and when the user has been assigned to a specific TRC (or multiple TRCs). These users will have an extra menu item when they are logged in, called Receptionist.
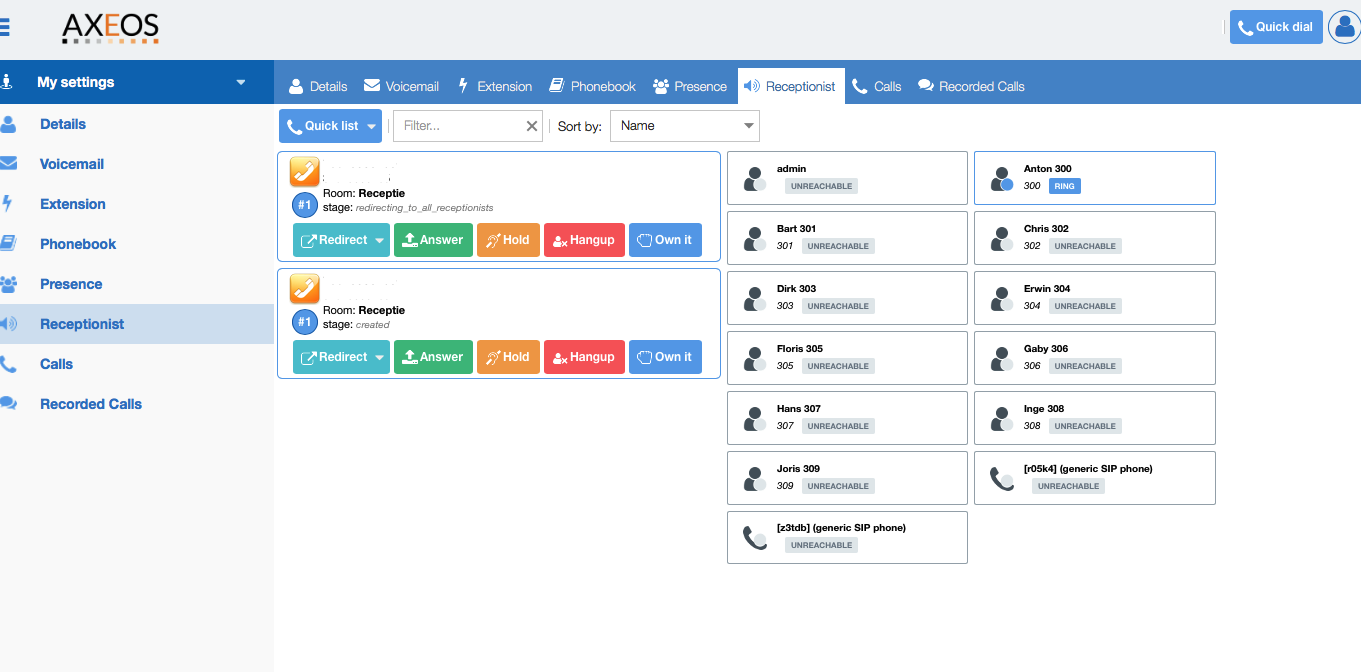
The screenshot above shows an incoming call. The TRC user can quickly put the call on hold without answering it. This is useful when already on a call. The answer button will pickup this call using the speaker or headset, using an auto-answer header.
Status color code:
- yellow: phone or user in ringing state;
- green: not on the phone – available;
- red: talking – busy;
- dark red: do not disturb is switched on, on the phone or in the end-user interface;
- blue: returned call from unanswered blind/cold transfer or call on hold
Transfering calls
When a call is on hold, the icon shows in blue. You can either do a warm transfer (first talk to the person you want to transfer to), do a cold transfer or another TRC user could grab the call by clicking “own it”.
By ‘grabbing’ calls, TRC users can share the incoming calls.
Warm transfer
Caller A rings: after speaking you put the call on hold.
You use the “Call to” field (right next to Quick list and Autoanswer) to call person B you want to speak to before transferring the call that’s on hold.
You can use the “redirect” button or just drag and drop the call using GUI.
A and B will be connected and Caller A’s TRC item on the TRC call menu has disappeared.
Cold transfer
Simply use the redirect button or drag and drop the call where you want to transfer it to.
A call transfer can be executed by entering a number or by selection from the quick list. You enter external and internal numbers.
You can also use drag&drop to transfer a call.